
This series of blogs is going to be where I share my journey of learning to slackline. If you’re unsure and looking to find out more about slacklining, I’ve written an article all about the origins of the sport and what it actually is. I’ll be taking you with me every step of the way, right from the beginning of figuring out what equipment I need to buy. That, as well as getting set up for the first time is what I am going to cover in this first blog. Now, in order to complete this series of blogs, I have set myself the goal of doing a backflip on the slackline. Right now that seems a long, long way away, but that’s the point, I’ve set this site up to share my experience of challenging myself to learn new things. It’s worth at this point mentioning my past experience and why I’ve set myself this goal. I was a gymnast for nearly 20 years, so this isn’t about learning to do a backflip, but can I become proficient enough on a slackline to transfer that skill.
Equipment to Get Started
Getting started with slacklining is actually relatively cheap and easy to do. For around £30 ($35) you can buy the basic equipment required to get you set up and taking your first steps in no time. Companies such as Barefoot, Gibbon, Macaco and Trailblaze have put together packages that contain all of the basic requirements. These packages include; webbing (the slackline itself), a ratchet, training line, tree protectors, a drawstring bag to hold everything and instructions. The instructions take you through setting the slackline up, which we’ll also go through later in this blog, as well as how to take your first steps. I went for the Barefoot package which is a beginner kit with everything you need to get started. So far, I’ve had no issues with the kit and everything seems to be working well.

If you’re lucky enough to have 2 anchor points available about 5m apart, (trees, large rocks, tow bar etc.), then these kits provide everything you need to get started and you can skip down to the section about setting up your line. If you’re willing to travel to your local park then you will almost definitely be able to find a suitable location with 2 trees the right distance apart. If however, like me, you don’t have 2 anchor points available and would rather practice in the privacy of your own garden, then don’t panic, I’ll show you how I got started using an A-frame.
Building an A-frame
There are lots of guides available on the internet for how to make an A-frame as well as ones that you can purchase that you put together yourself. I only needed one A-frame as I do have one tree that I could use, but you could just replicate for 2. One thing I wanted was to have multiple height options so that the set-up would grow with me as I learn more skills and tricks. I also wanted to make the A-frame transportable so that we could take it and set it up elsewhere if we wanted to. All the while doing it at little to no cost. My wife, Zoe, used to have a park bench as her outside seating which since upgrading has given us some weatherproof wood that we have used for various DIY projects, and that is what I ended up using to build my A-frame.
Using the last few pieces of the bench, I cut two larger pieces to 115cm as well as two shorter pieces to go across the middle and make the two height options. I set these at 45cm and 75cm, which equated to roughly my knee and hip height. The two longer pieces I set at an angle to make the top of the A-frame about 1m tall. To connect the whole thing together I used a combination of nuts and bolts as well as locking pins to allow the cross arms to fold against the main uprights and the whole thing to fold into effectively 1 thicker piece of wood.
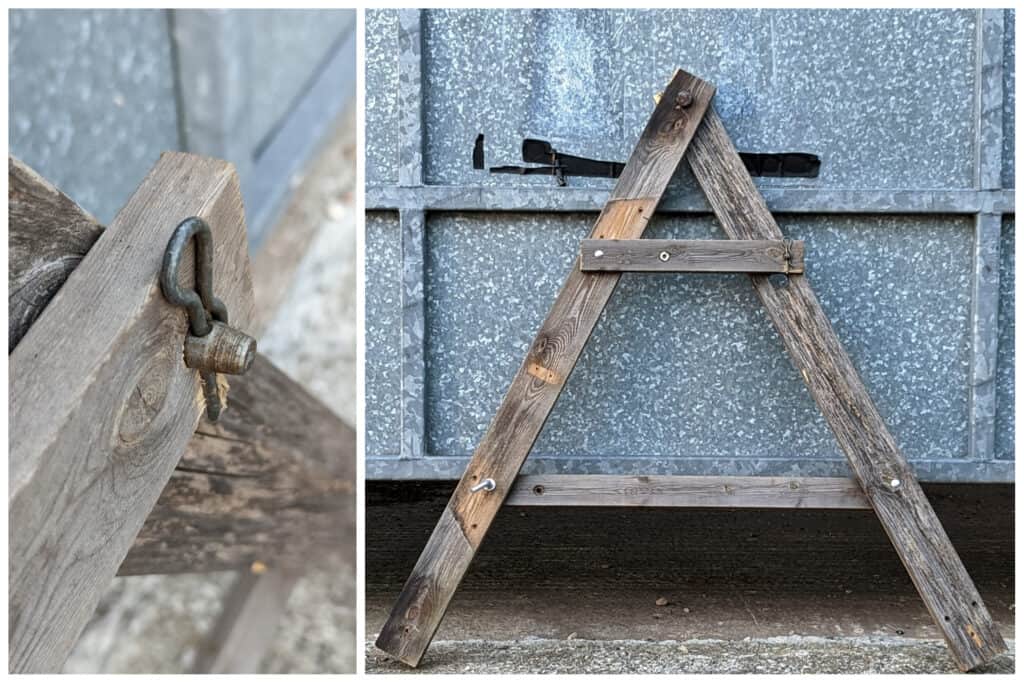
So far this set-up is working, however, because I’ve tried to make use of what I already have in my toolbag or what my father-in-law has in his shed, the locking pins are only just long enough which means the folding mechanism isn’t working as I had intended. Having said that, the A-frame is holding together and has supported me through my first few sessions.
In order to anchor the A-frame end, you also need a length of wood c. 40cm long to be able to put some long sturdy pegs through to hold the slackline once it’s tensioned. I attach the loop of the slackline to this anchor and put the ratchet at the tree end. The pegs need to go quite deep into the ground, about 30cm as the tension required to hold the slackline and your body weight is quite a lot. The first time I tried to do this I got it completely wrong and once I started ratcheting and tensioning the line, it immediately began to pull the anchor wood out of the ground. As I didn’t have anything to make it work immediately, I borrowed the farm tractor which had plenty of weight to act as another anchor. Whilst most people don’t have a tractor, you could use a car with a tow bar in a similar way. Before the next session, I got some longer pegs which then held really well.

Where to do it?
The great thing about slacklining is that it’s so versatile and can be done anywhere where you have 2 anchor points. The equipment comes with a bag which means you can easily take it with you wherever you go. The most common forms of anchor used are trees which makes local parks an ideal location. As you gain experience the distance between the anchors can increase but initially, this wants to be about 4-5m to help gain confidence.
Getting Setup
Getting set up the first few times is going to take a little while, but that does get quicker as you practice it more and more. Once you’ve figured out where you want to set up, if you’re using an A-frame get this side set up first. Make sure your anchor is well secured in the ground and feed the slackline through your A-frame towards your other anchor (tree, car etc.). At the other end, it’s time to set your ratchet up, if you’re using a tree put your bark protectors around followed by your ratchet strap. At this point, you should have your ratchet strap around the tree and the end of the main slackline together. Feed the main line through the ratchet pulling all loose material through. You want to pull this as far through as you can to not overfill the ratchet. The first time I didn’t pull enough through, which meant the ratchet became very hard to tension anymore but the slackline was still too loose to hold me. So pull as much of the main line through as you can before starting to pull the handle of the ratchet. Keep ratcheting to increase the tension to a point where you can stand on the line. You can set up the training line, which is just a smaller version of the mainline and that can provide something to help you balance. You set the training line up above the main slackline, which gives you something to hold onto as you take your first steps. The training line is fixed at both ends which means although it isn’t tight, you can lean on it to support you.
Getting Started
Now you’re set up, you are ready to have a go and it’s going to feel a bit strange the first time you stand up on a surface that moves underneath you. The instructions that come with your pack from Barefoot also give you guidance to taking your first steps and the aim, to begin with, is to be able to balance on one foot. The first time I stepped onto the line, I couldn’t control my foot as the whole line shook from side to side really quickly. This took some getting used to and really required me to engage my core whilst keeping my standing leg slightly bent. I spent the first session trying to stop my foot from shaking, and in half an hour made enough progress to link a couple of steps together.
That’s where I’m going to end this blog and next time I’ll share more about my first steps and early progression.